Showing posts with label Freezer Cooking. Show all posts

Wednesday, August 21, 2013

Lunchbox Food: Kickin' Turkey Taco Rolls (Freezer Cooking)

Last week, I shared my Pizza Triangles
This week - it's Kickin' Turkey Taco Rolls

First I started with my pizza dough. I just added a 1/2 teaspoon of red pepper flakes to the dough.

1 lbs ground turkey
1 can diced tomatoes
1/2 cup frozen corn
1 envelope of taco seasoning

Brown the turkey and add the remaining ingredients. Let it cook together for about 5 minutes. Then add a heaping handful of Chedder Cheese into the mix. Stir well. My mixture still had alot of juice from the tomatoes in it, so I put the whole mixture into a strainer before spooning it onto the bread.

Roll out your dough, as we did in the Pizza Triangles and starting spooning your taco mixture onto the bread. 


Pinch them together - make sure the seams are tight and bake at 450 degrees for 12-15 minutes.

Let me cool completely and toss into a freezer bag.
These are great for busy mornings to throw into the lunch sack!


Tuesday, August 6, 2013

Lunchbox Food: Pizza Triangles (Freezer Cooking)

School here starts in about 2 weeks So I'm in the process now of getting prepared. Part of me being prepared is making sure I have a good supply of school lunches on hand. Our kids take their lunches to school, and having more then just PB&Js everyday is something they really enjoy. This recipe is super easy and takes less then a half hour to make!

I use my bread machine to make this bread - you could easily use some refrigerated biscuits or frozen bread dough.

Pizza Dough (for bread machine)

1 cup water
2 TBSP vegetable oil
3 cups bread flour
1 tsp salt
1/2 tsp sugar
2 1/2 tsp active dry yeast

Put everything into the bread machine and turn to the "dough setting".

Additional ingredients needed:

Pizza Sauce
Pepperoni, Hamburger or Sausage
Mozzarella Cheese
Peppers, ect - add any pizza toppings you like!

After the dough is done, I roll is out as thin as I can and cut into triangles. Check out the pictures to see how to assemble these bad boys.

Lay them seam side down onto a greased cookie sheet. Poke three holes on the top of each one, to let the steam escape. Bake at 450 degrees for 12-15 minutes.

Let them cool completely. Toss into a freezer bag and into the freezer they go!

This makes about 10 Pizza Triangles for me. I make mine pretty big and usually one of them with some sides are enough for Ashton
The beauty of the Pizza Triangles in that you can put them into your kids lunch that morning and by the time they're ready to eat, it's defrosted and ready to eat.

You can also heat them in the oven in the morning, wrap in foil if the kids would prefer to eat them warm!


Monday, May 20, 2013

Freezer Meals Using What's in Your Pantry


I've been wanting to do some freezer cooking here lately and have been pouring over my Pinterest boards. I have a ton of ideas pinned - but couldn't get my brained focused enough to print out all the recipes that I wanted to make and make a grocery list. It hit me to just pull everything out of the pantry and freezer just to see what I had. 


I had two bags of frozen chicken breasts, 2 lbs of ground chicken, a 1 1/2 lbs of ground beef, stew meat and  plenty of cans of diced tomatoes.


 I did go buy the green bell peppers and carrots - but everything else I had. 


It's amazing to me some of the things I found at the bottom of my freezer...some Rotisserie Chicken, the Kraft Fresh Take cheese mixes and a lot of shredded cheese!

Thursday, April 25, 2013

Cheesy Chicken Nuggets


All kids like chicken nuggets right? 
Mine sure do.

These Cheesy Chicken Nuggets are moist and crunchy...
a perfect combination!

The key to making these nuggets so great are soaking them overnight in milk.
Cut a boneless, skinless chicken breast into bite size pieces.
Into a plastic container throw in the chicken, a tablespoon of seasoning salt and enough milk to cover.

#1 - Put a lid on it and store it in the fridge overnight.


#2 - Make sure and drain any excess milk off the chicken pieces.
#3 - I used about 2-3 cups of Reduced Fat Cheddar Crackers. Place them in a zipper sandwich bag. Push all the air out and seal the bag.
#4 - With a rolling pin, smash the crackers...leaving a few big chunks is alright.


Breading these nuggets is easy - no need for an egg wash, the chicken is already moist from the milk soak.

Place your smashed up cracker bits on a plate and roll each nugget around.
Make sure and push the bits into the chicken.
Place the nuggets on a cookie sheet lined with foil and sprayed with cooking spray.

Bake nuggets at 350 degrees for 10-12 minutes.
If you want yours a bit more crispy...leave them in there for 15 minutes.

Serve warm with BBQ sauce and you'll have some happy kids!


I made a huge batch of nuggets and stored the rest in the freezer for a quick lunch.
They can go back in the oven at 350 for 5-10 minutes.


Thanks for stopping by!


Linking up to:


Wednesday, June 27, 2012

Broken Camera But Some Great Spaghetti Sauce!

UGH!!!

I went to turn on my camera yesterday to show off the AWESOME homemade spaghetti sauce that I made, but it won't turn on! It makes a noise like it's trying to come on and the lens moves as if it wants to come out, but it doesn't.

I have NO IDEA what's wrong with it. I'm hoping to get it fixed but this coming weekend - we're going camping and I love getting pictures of the boys in their element! =)

I'll have to take it up to the camera store to see what they can tell me.

But...I did make an amazing spaghetti sauce last night...I used 2 large cans of diced tomatoes (24 oz each) and threw them in the crockpot. I added basil, sea salt, dried onion and just about every spice I have in my spice rack. Turned that sucker on high and let it stew for about 4-5 hours.

That was yummy! And, I used Muir Glen tomatoes - so it was organic too! (I love their fire roasted tomatoes!)

I did take a few pictures with my phone last night - but I'm not real happy with the quality...but here ya go:


With dinner, I made my "Famous" garlic bread....my boys love it, but it's just bread with butter, garlic, basil and parm cheese but under the broiler until it's browned (not burned!) The two cans of tomatoes made a huge amount, so I froze what we didn't use and that will make for a quick supper one of these nights. 

Thanks for checking into Cooks + Creates today! Become a follower through Google Friend Connect, Linky or Network followers! You can also follow me on Twitter and Pinterest too!

Today I'm linking up to:

Tuesday, June 19, 2012

Easy Breakfast Burrito's

My husband is in love with these breakfast burritos. He eats them for a quick breakfast in the morning and says they make a great lunch too. They are great for camping and great for a quick on-the-go snack. 

I love how easy they are to make. Cheap too. Here's how you do it:

You'll need:
1 lbs breakfast sausage
3-4 large potatoes
5-6 eggs
1/4 cup milk
10 tortillas
1 cup cheddar cheese
green bell pepper (optional) 
onion (optional)

First you're going to start off by browning the sausage.


Make sure and season the sausage with salt and pepper. My family won't eat the peppers and onions, but if yours will, now is the time to dice them up and brown them with the sausage.

While the sausage is cooking, start washing and peeling your potatoes. Preheat your oven to 350 degrees. 


Dice the potatoes into small bite sized pieces. Then you'll smooth your potatoes in a single layer onto a cookie sheet. Pour some EVOO over all of them. Here's my favorite from Trader Joe's! 


Season the potatoes too. Use whatever you have on hand. I happen to have some of the best seasoning in the whole wide world for my potatoes.... Jack Stack All Purpose Rub !


Place the potatoes in the oven for 20 minutes, or until tender. 

After the sausage is done cooking - drain the oil of of it. 

Now for the eggs. 

Crack 5 to 6 eggs and add your milk then shake them up, I like to use my Tupperware Quick Shake .


I use the biggest, deepest pan I have to cook the eggs. Cook the eggs until they are about three fourths of the way done. After the eggs are done - throw everyone in the pool. Then add the drained sausage and cooked potatoes in the pan. Cook on medium for about five minutes. Stir well to make sure everything gets browned a little more.


Add a cup of cheddar cheese - or whatever kind of cheese you have on hand. 


Stir everything up really well. This is going to be your last chance to season the dish, so make sure and give yourself a taste at this point to make sure it's yummy. If your family likes spice - add some cayenne pepper or Cajun seasoning. 

Now it's time to get rollin'!


Using a 1/3 cup, start filling the tortilla's with an over-flowing cup.


Then roll them up by tucking and folding. Then you'll wrap each on in a paper towel. 


After your done with all 10 tortillas, you'll go back and wrap each on in plastic wrap.


Once I'm done wrapping up all the burritos - I put them into one larger freezer bag and stick them in the freezer. These don't do well to heat from frozen, it's best to let them sit out in the refrigerator overnight first. 

When you heat up the burritos, you'll remove the plastic wrap but leave on the paper towel. You'll cook each one for about 2-3 minutes. Serve with your favorite salsa and sour cream.


And enjoy! 

Note: If you wanted to make these into a lower fat version, you could use turkey sausage, low fat cheese and whole wheat tortillas. 


Thanks so much for stopping by - please become a follower of my blog!

I'm linking up today to: 


Tip Junkie handmade projects

Thursday, April 12, 2012

Easy Breakfast - Peanut Butter Pancakes

My kids love their breakfast - the two of them can go through an entire box of cereal in a matter of days....and they're only 8 and 3. I can't imagine what it'll be like in a few years. I use coupons on cereal - so can usually get them for around a $1.00 a box, but I'm starting to look for healthier alternatives and the organic brands of cereal get pricey. I'd be spending about $30 a month (or $360 a year) just on cereal!!

I always think about how easy it is to whip up extra pancakes or waffles and freeze them. So today I decided to whip up a bunch of mini pancakes for the boys and added an extra twist for them with the peanut butter.


These pancakes are super easy to throw together and then to freeze for breakfasts throughout the week!


Peanut Butter Pancakes

Makes 24-36 mini pancakes

1 cup all-purpose flour
1 tablespoon sugar
2 teaspoons baking powder
1/4 teaspoon salt
1 egg
1 cup + 1 tablespoon milk
2 tablespoons applesauce
3 heaping tablespoons smooth peanut butter

Combine flour, sugar, baking powder and salt. Combine the egg, milk, applesauce and peanut butter in separate bowl. Mix well. Add egg mixture all at once to flour mixture. Add additional milk if batter is too thick. For mini pancakes, use a tablespoon to scoop batter directly onto greased griddle or skillet. Cook over medium heat for about 2 minutes on each side. 


Let cool and spread a single layer of pancakes onto a cookie sheet. Put into freezer until pancakes are froze. Then transfer to a freezer safe bag. Label and place in freezer, store for up to 3 months. 
Reheat in microwave for 15 seconds on each side or warm in a toaster oven. Serve with syrup or jelly. 


My kids love to dip them into syrup. These pancakes also make great PB&J Sandwiches or dippers for school lunches! 


I've linked to:


Friday, March 2, 2012

The Best Meatloaf Ever....Seriously!

I spent years and years (and years) hating meatloaf. My mom was a great cook, but her meatloaf was bad. Dry and tasteless (Sorry, mom! Love you!) 

It wasn't until a few years ago that I started searching for ways to jazz up meatloaf. When I found the perfect mixture of meatloaf, I was completely hooked. I make this twice a month - and I always make a double batch! This meatloaf freezes perfectly and makes a great dinner on those nights when everyone is feeling rushed.

Let's get started why don't we?

Ingredients (for two pans) Feeds 3-4 each pan

3 lbs hamburger
2-3 cups of oatmeal
4 large eggs
1/2 onion diced
1 head of garlic, diced
1/2 cup BBQ sauce
3 TBSP brown sugar
1 tsp salt
1 tsp pepper

Grab a big bowl! Start off by everyone jumping in the pool.


Mix with your hands. I've found this is the best way to get everything perfectly mixed. 
Tip: Run the water in the sink warm before you start mixing. Then you don't have to goo up the faucet when you go to wash your hands. 


Grab two casserole dishes. Spray each one with non-stick cooking spray. 


This is a fun trick that I learned from Paula Deen - take a slice of bread and lay it in the bottom of the casserole dishes. This helps soak up all the extra grease from the hamburger. 


Divide your mix into the two dishes. Pat down. Take your fingers and 'poke' them down into the meatloaf. This helps with the next step. 


Now for the sauce:

1/2 cup ketchup
1/2 cup BBQ sauce
2 TBSP brown sugar
Add enough water to make 1 1/2 cup of sauce

Wisk with a fork. If its too runny, add more ketchup - too thick, add more water. 


Pour this sauce over both meatloaf dishes. Take the back of a spoon and spread it all over, making sure it gets down into the holes you poked. 


Top both dishes with foil. Stick one in the freezer and the other one in the oven at 350 degrees for 1 hour! For the last 10 minutes of baking, remove the foil. 

To defrost, leaf meatloaf in refrigerator overnight, bake as above.  

You'll find this is the juiciest and tastiest meatloaf you've ever had! Not to mention easy and cheap to make!

Monday, January 16, 2012

PB and Jelly Muffins - Freezer Cooking

My oldest son, Ashton takes his lunch to school. I've found that it's much, much cheaper then buying him school lunches everyday and after reading about all the fat, sodium and preservatives in school lunches - I thought this would be much healthier for him.

The problem of course with packing lunches everyday is offering variety. I could pack sandwiches, chips and a drink everyday - but I have a feeling that Ashton would get burnt out pretty quickly. So, I've been coming up with some ideas to make ahead of time and freezer for his lunches.

These PB&J Muffins are so easy to make - all ingredients go straight into the food processor (one of my fave kitchen gadgets!)


For this recipe, I prefer to use whole wheat flour. The muffins would be a little more moist with regular white flour, but I think this is a great way to add whole wheat into Ashton's diet (and he doesn't even notice!)


Toss all ingredients into the food processor. If you're kids are cooking with you - this is a great job for them!


Pulse the processor until everything is mixed. This doesn't take long! Make sure and scrape down the sides at least once to get everything mixed well.


You can use cupcake liners...but I find it just as easy to spray the muffin tin down really good with cooking spray. I've also made a bite-sized version of this muffin by using mini muffin tins. Great for little hands!


Using a large spoon load the muffin cups up. This recipe could easily make 2 dozen muffins - I opted for 1 dozen larger muffins.


While the muffins are in the oven, I got started with my jelly. Since I have all of the Wilton bags and tips, I used those. I used one of the largest tips I have. If you want to use a plastic sandwich bag with the tip cut off - that might work too.

When filling my pastry bags, I like putting them upside down in a drinking up. Hands free work!


Any kind of jelly or jam will work for these muffins!


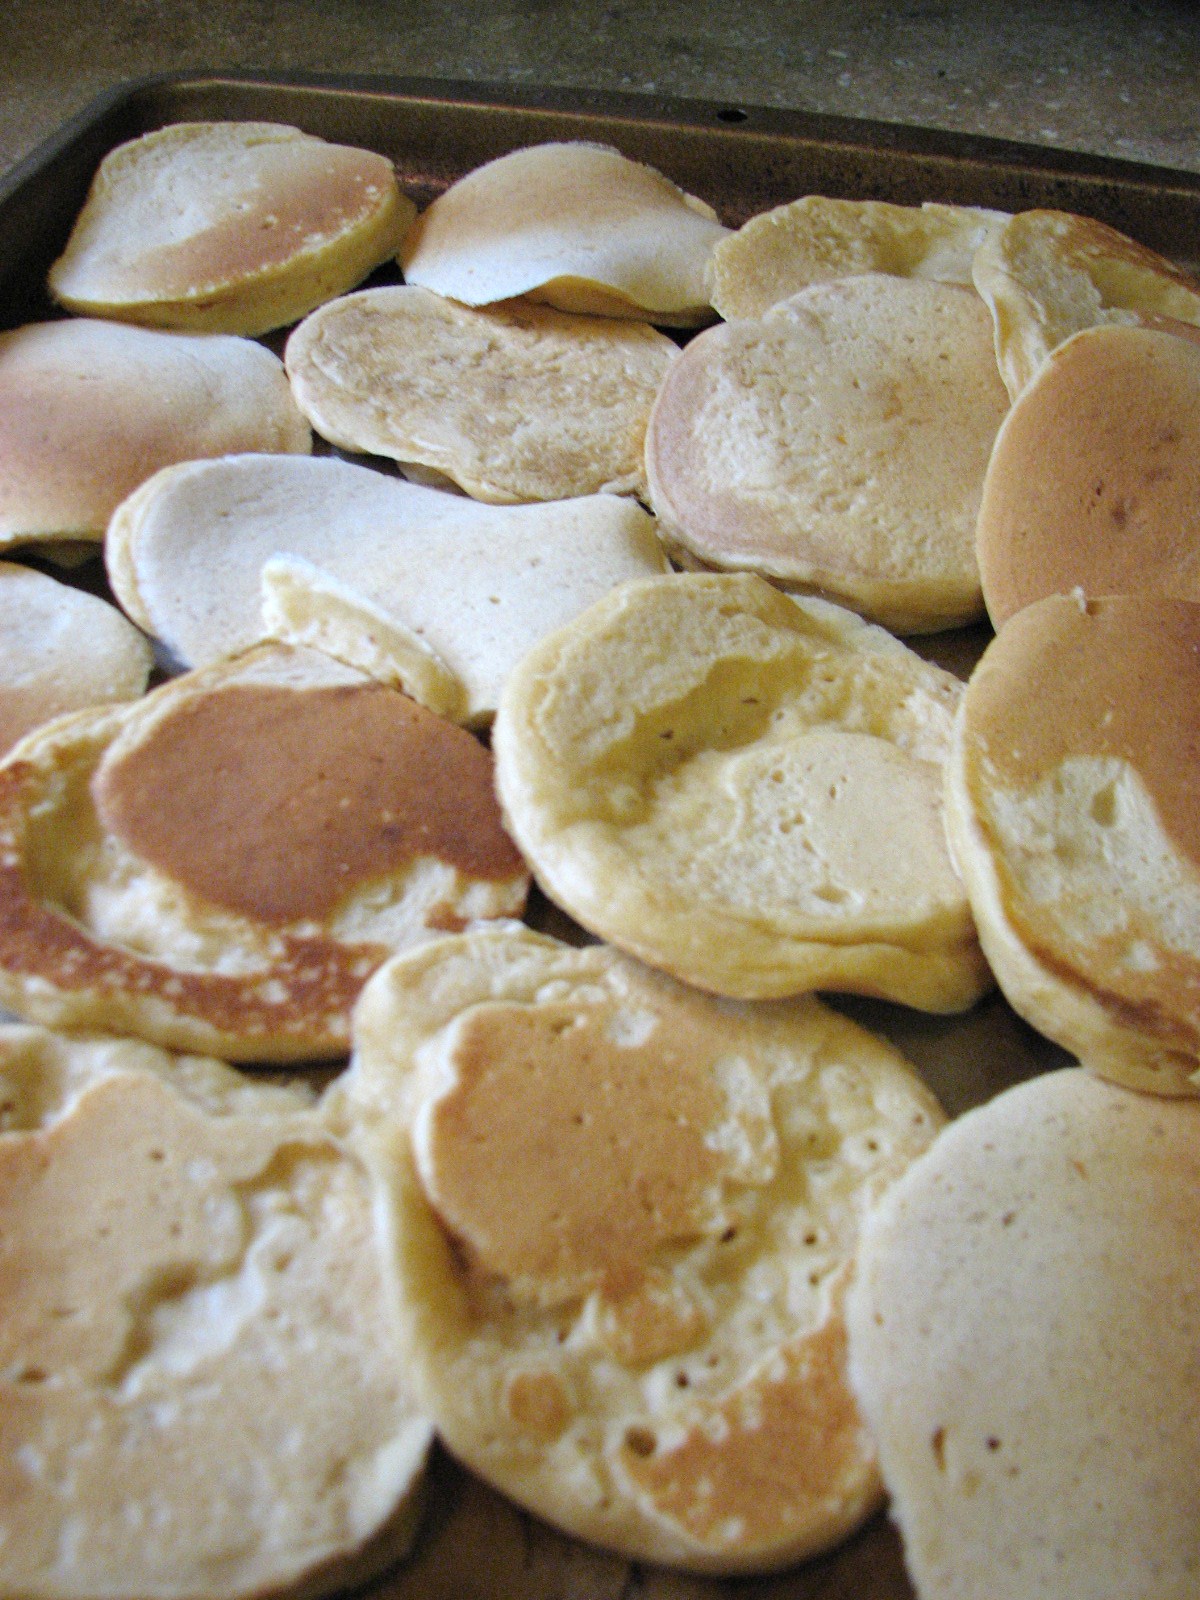
My muffins came out HUGE!!! They made the whole house smell SO GOOD!


Dump your muffins onto a cooling rack. Make sure your husband and kids stay clear....muffins always seem to disappear when they are near.


Don't let the muffins cool all the way, it makes piping the jelly in harder. I filled the muffins over and started filling them with jelly. (I used a glass just for a picture) You'll need to figure out for your muffin size how much jelly is needed. I just squeezed until I could almost feel it on the outside of the muffin.


Here's where this can get a bit tricky. Jelly is messy. I've found the best way to control the goo is to put the muffins upside down back in the muffin tins. Once you're finished filling all the muffins - put them (while still in the tray) straight into the freezer for at least an half hour. Note: The jelly won't freeze 100%.


Once the muffins are froze place them in a large freezer storage back. Store them in the freezer. I pack Ashton's lunch the night before and then leave his lunch in the fridge to give the muffins time to thaw out overnight.

When I make these muffins, my hubby always insists that I leave a few without jelly - his fave way to eat them is warm, sliced and spread with honey!


These muffins are a great way to change up lunches! You can add anything you like to these muffins - flax seeds, chocolate chips, or raisins!

Thanks for stopping by for my very first post! I hope these muffins will be a hit in your house like they are in mine!


PB&J Food Processor Muffins

2 cups Whole Wheat Flour
1/4 cup granulated sugar
1 tsp baking powder
1/2 tsp baking soda
1 cup chunky peanut butter
1 cup milk (soy milk works great too)
2 eggs
1 tsp vanilla
1 cup jelly or jam (any flavor)

Combine all ingredients in the food processor. Pulse until mixed well. Scrap sides of bowl to ensure that everything is mixed. Spray muffin tin with cooking spray or use cupcake liners. Pour batter into muffin tins and bake at 400 degrees for 15-20 minutes.

Using a piping bag, add jelly. After the muffins have cooled slightly pipe the jelly in to the bottom of each muffin. Serve warm or freezer in gallon freezer bags.


I'm linking up to these parties: